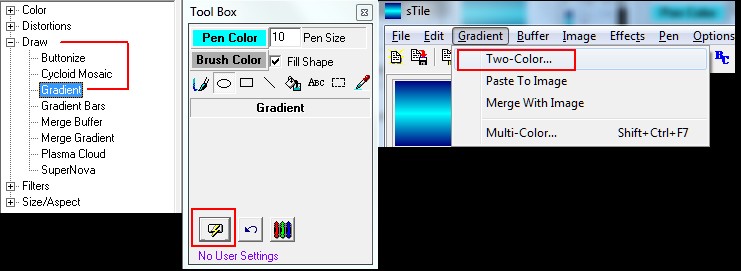
Gradients are a key part of making images with sTile. There are two types of gradient, 2-color and multi-color. 2-color gradients have more shape options while multi-color gradients consist of linear gradients. Gradients are what give the images their texture or depth.
The 2-color gradient designer is accessed through the Draw group in the Effects tree or through the Gradient menu.
HINT: To get the best textures, choose a darker color and a lighter color. Use the Define Custom Colors in the Color Picker dialog to see the brightness.
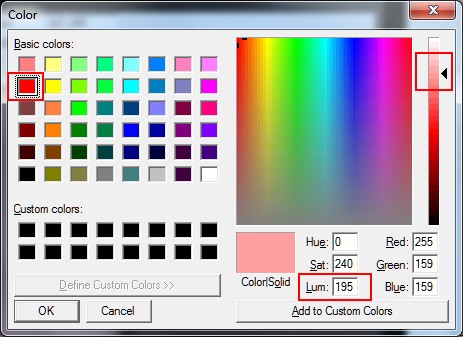
If you start with a 'Basic' color and then click the Define Custom Colors >> button, you see additional ways to adjust that color. The black triangle on the right side slides up and down to adjust the Luminance, or you can type in a value in the Lum box. As you make changes, the new color is shown in the Color|Solid box.
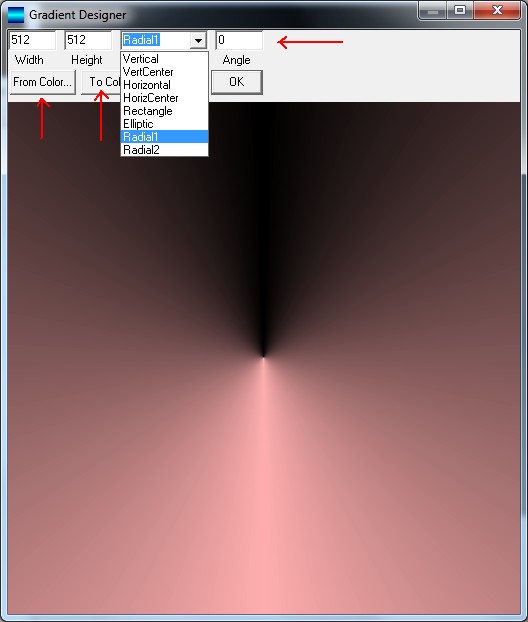
The 2-color gradient designer has several types to choose from. The Radial types also allow an angle to be specified. Use the From Color and To Color buttons to choose the two different colors. Finally when you click OK the gradient is drawn on the main canvas.
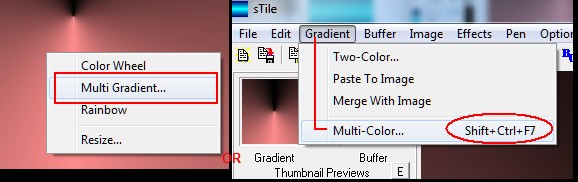
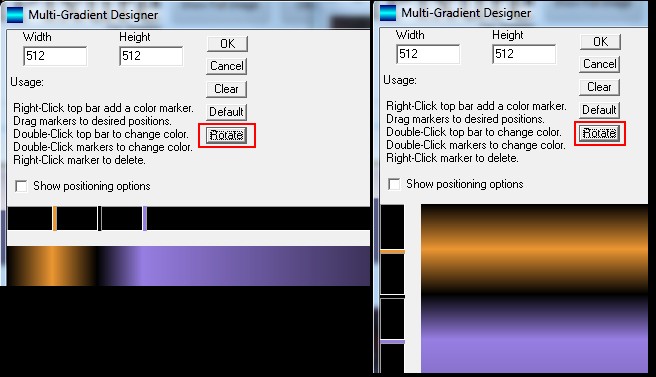
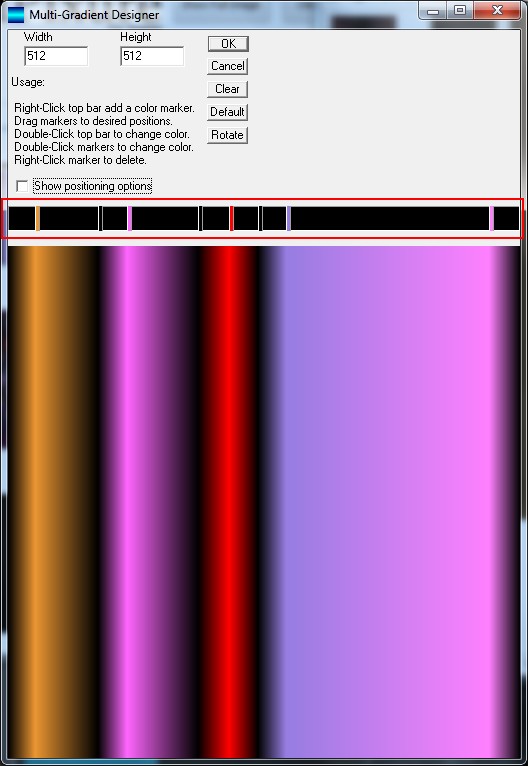
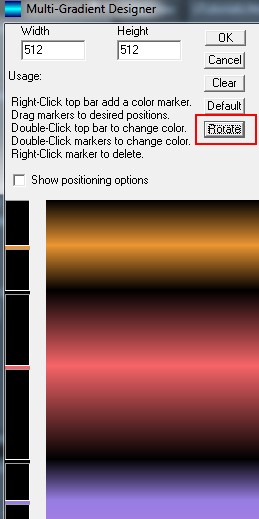
The Multi-color gradient designer is accessed from the main image popup menu (right-click the canvas), the Gradient menu, or keyboard shortcut Shift+Ctrl+F7.
The default gradient is pretty much random, but consists of two colors separated by black. The normal orientation is up/down (vertical) but by clicking on Rotate it will flip to sideways (horizontal). Click Rotate again to change it back to vertical.
The small bar above (or left of) the gradient is used to adjust the colors. The bar itself has a color (black by default), and markers are used to insert lines of color. Double-click the background to open the color dialog. Double-click an existing marker to open the color dialog. The markers can be dragged to any position using the mouse. Right-click the background to add a new marker at that spot, which also opens the color dialog where you specify the color of the new marker.
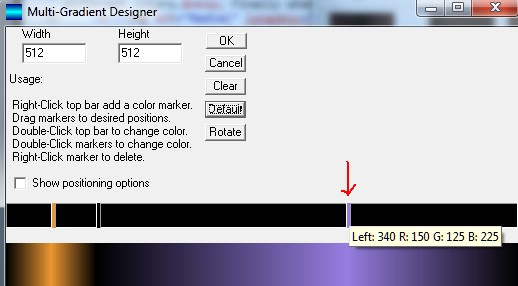
Marker has been dragged to new spot
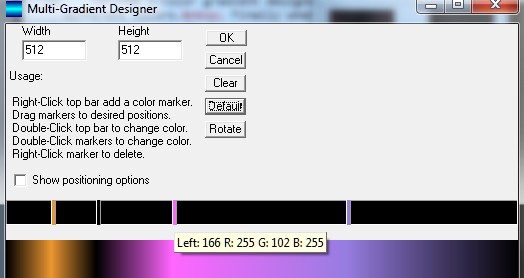
New pink marker added
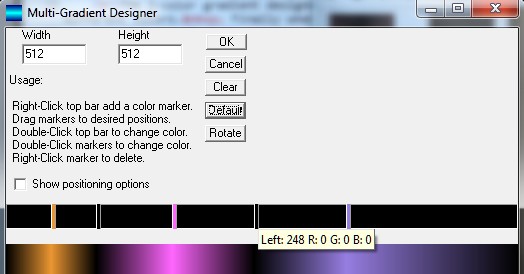
New black marker added
Multi-color gradient, using 8 markers on a black background
Back to Top
Effects
The sTile interface has generally 3 ways to select and Apply the various effects. The Effects tree on the left side; the Effects menu hierarchy; and keyboard shortcuts. I won't go through each effect, but will describe how they're used.
Effects Tree
When an effect is selected from the tree, the ToolBox changes to show any settings for that effect (if there are any). Use the ToolBox to change values for the effect, and then click on the Apply button.
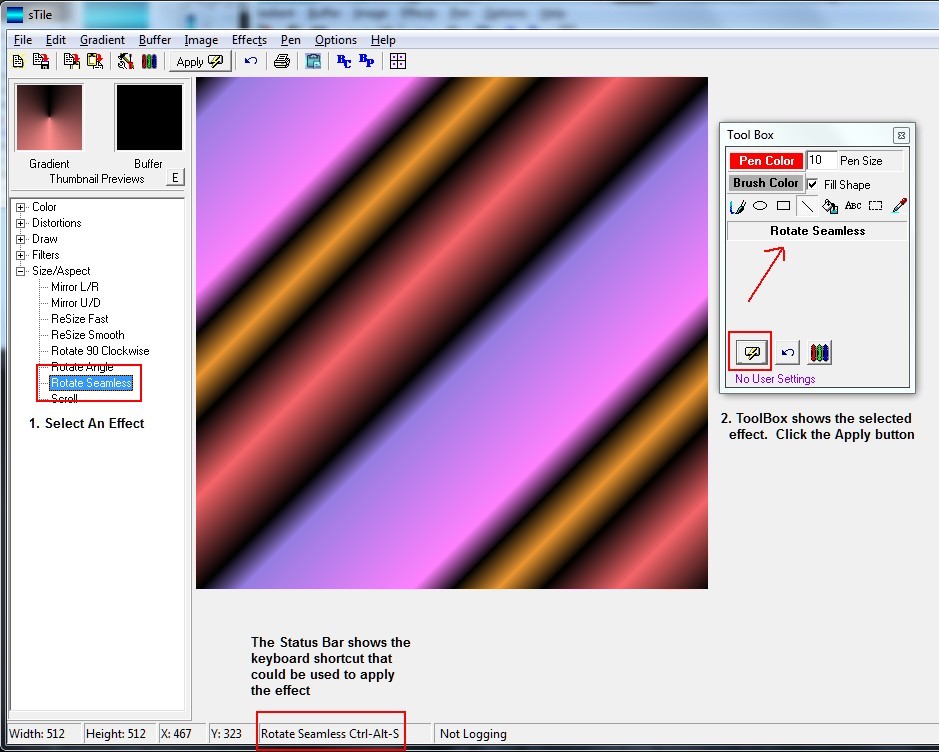
In this screenshot, I've selected the SineWave L/R and then used the ToolBox to change the Height to 128. When applied, this is the result. If you don't like the result, use the UnDo button to go back; change the settings and Apply again.
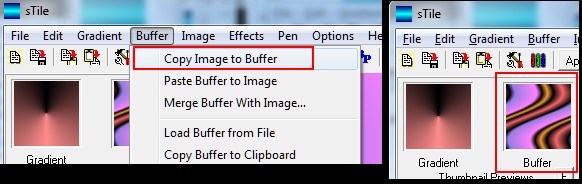
The buffer is used to store an image, which can then be used in some of the effects. To place the current image into the buffer, use the Buffer menu. The thumbnail will reflect the buffer image:
Next is a basic flip operation. Choose the Mirror L/R effect from the tree and click on Apply in the ToolBox.

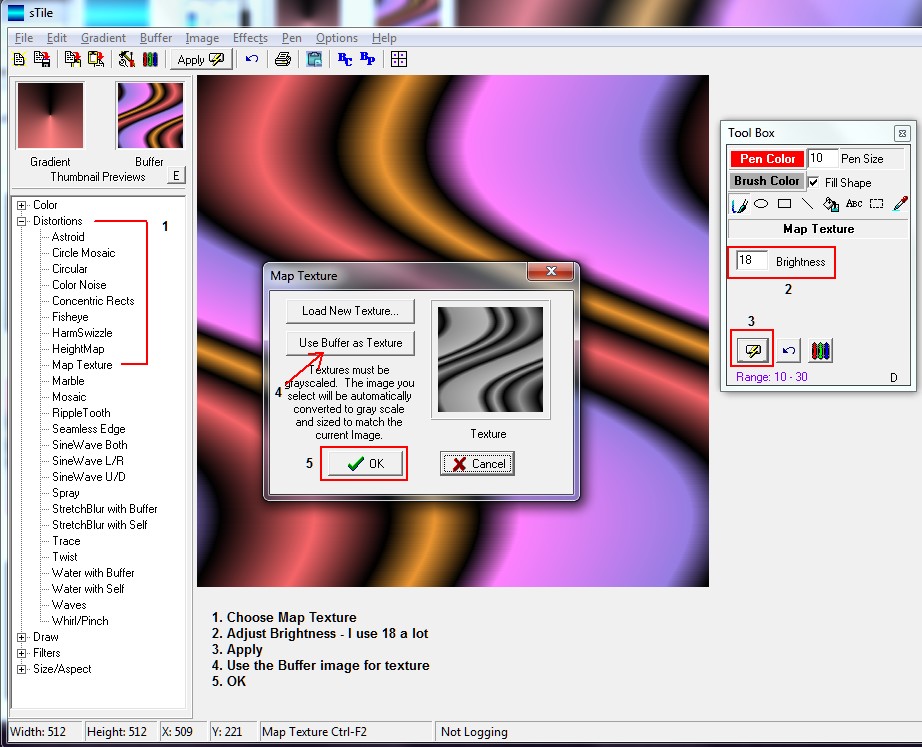
The Map Texture effect is one of my favorites and most-used effects.
That changes the main image to look like this:
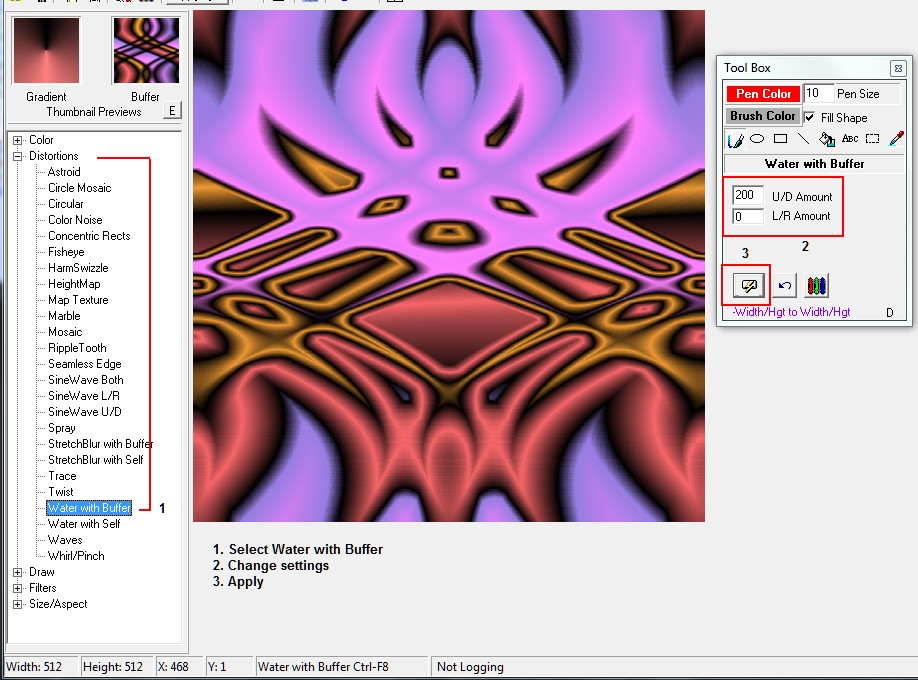
Store this image in the Buffer. Use the Buffer menu or keyboard sequence Alt > B > C.
Re-draw the Multi-color gradient. This time, rotate it to be horizontal
Apply the Water with Buffer effect
Map the texture again using the Buffer as the texture.
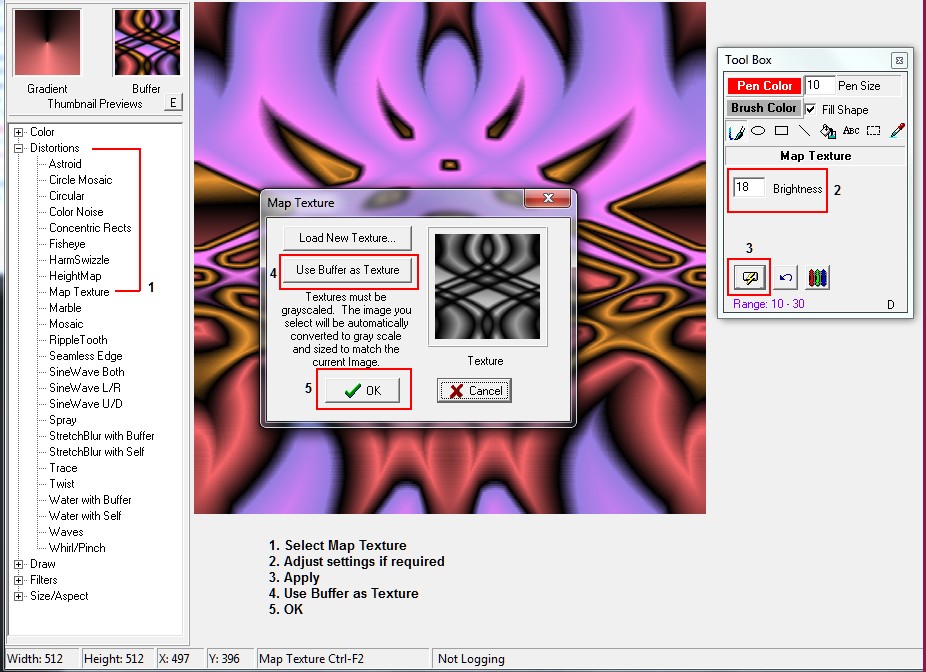
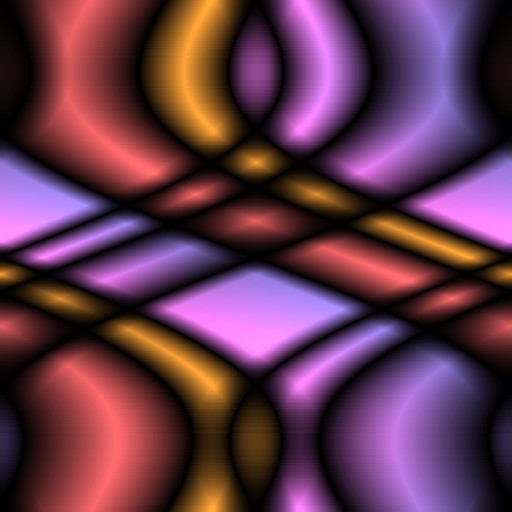
This one's finished:
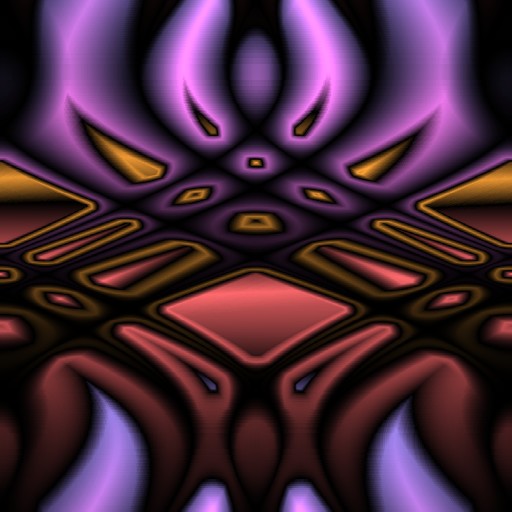
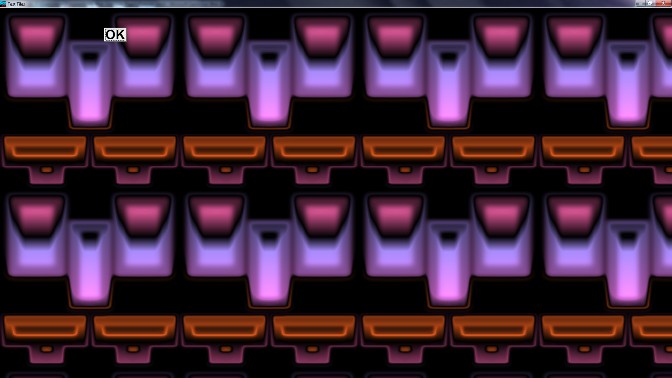
To see how it looks when 'tiled', use key combo Alt > I > T
Back to Top
Basic Shapes
sTile has very basic drawing capabilities. Free-form lines, straight lines, ovals and rectangles can be drawn. These are chosen from the ToolBox, and are drawn using the Pen Color and filled (if desired) with the Brush color.
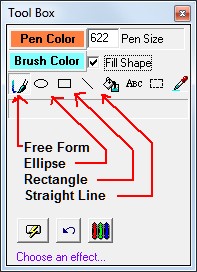
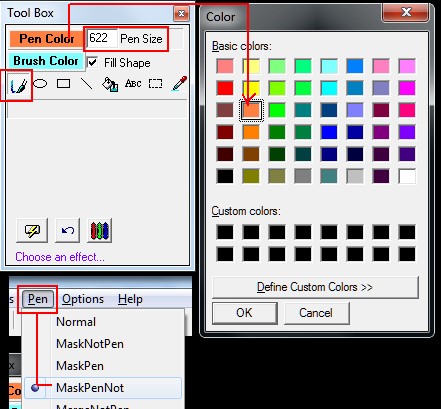
We'll start with the free-form tool, and use a Pen mode called MaskPenNot. Click on the Free Form tool, and change the pen size to something big like 622. That's bigger than the image itself so it will overlap the canvas, but that's OK. The pen has a round 'tip'; when the mouse is held down and dragged around the canvas it just draws a series of circles to create a line.
Here are the other settings:
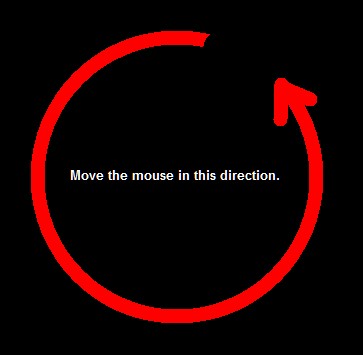
Now you have to do a free-hand drawing by clicking and holding the left mouse button down anywhere on the image, then dragging in a quick circular motion. Release the mouse button to stop drawing. Your drawing will not look like mine, but should be similar.
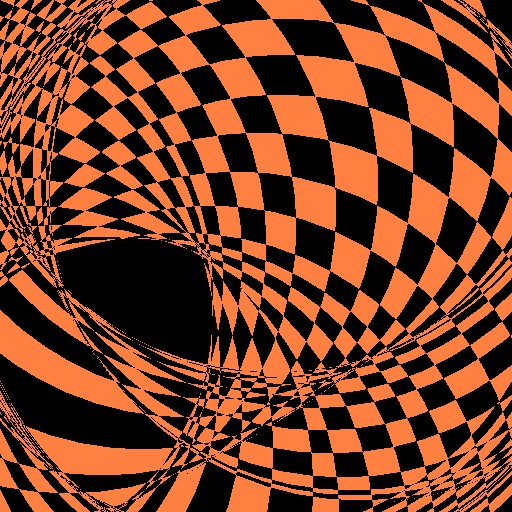
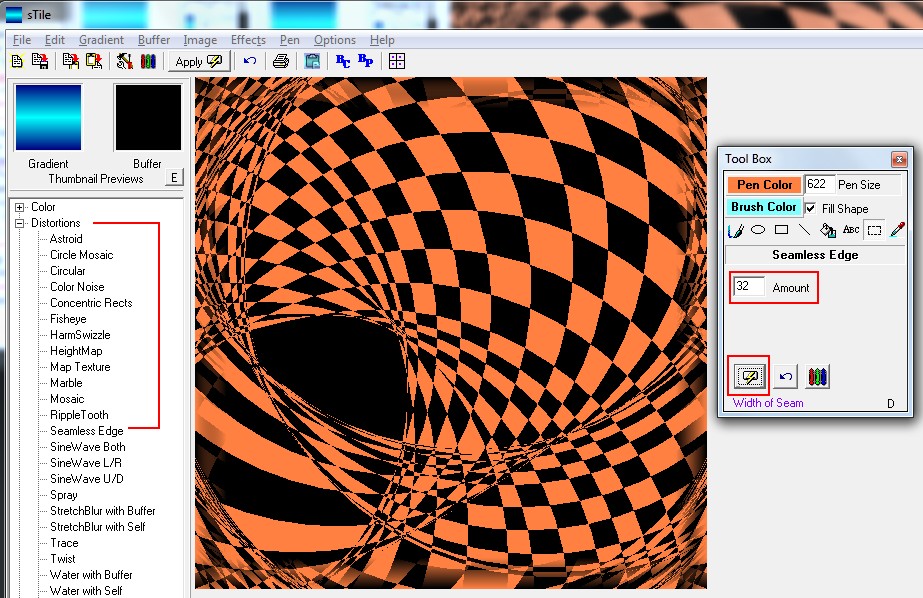
The image is not seamless. Let's make it somewhat seamless by applying the Seamless Edge effect.
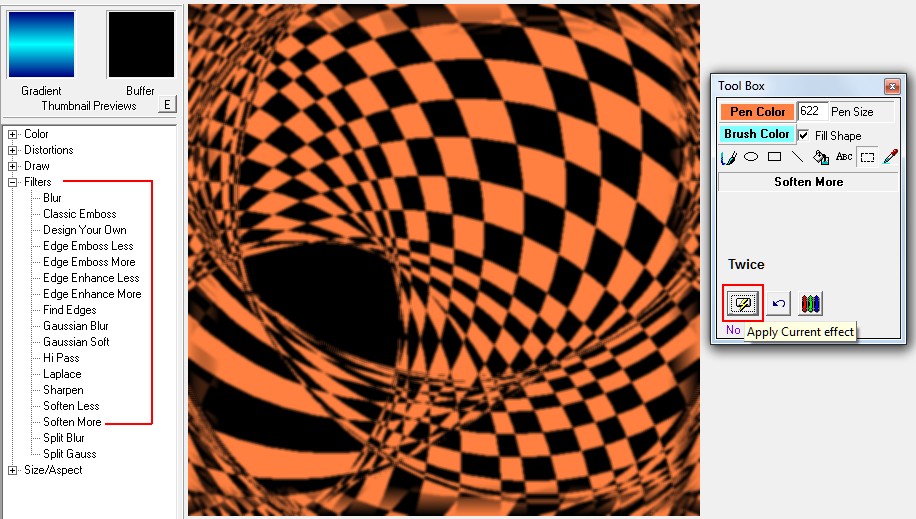
Soften it up a bit by applying the Soften More filter two times
Copy to the Buffer with Alt > B > C or use the Buffer menu.
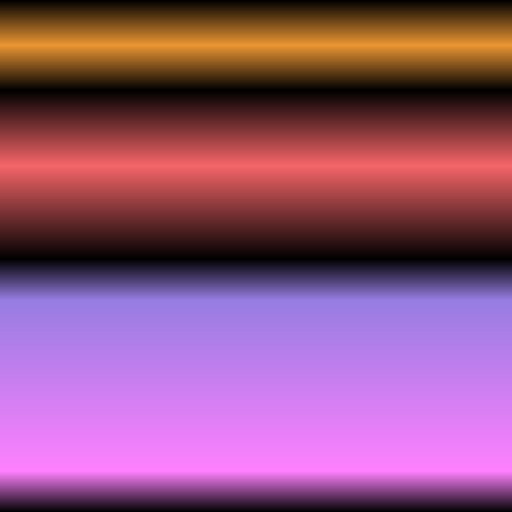
Next draw a Multi-gradient of some sort. Mine looks like this:
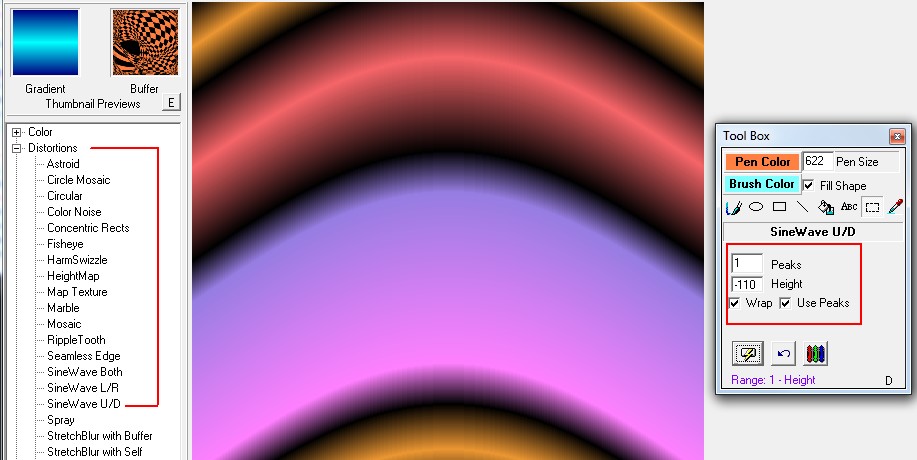
Apply the Sine Wave U/D with these settings:
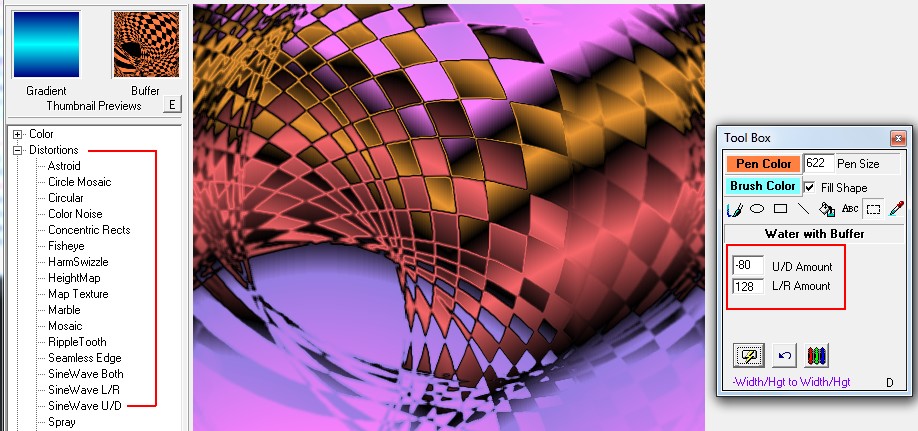
Apply the Water with Buffer effect with these settings
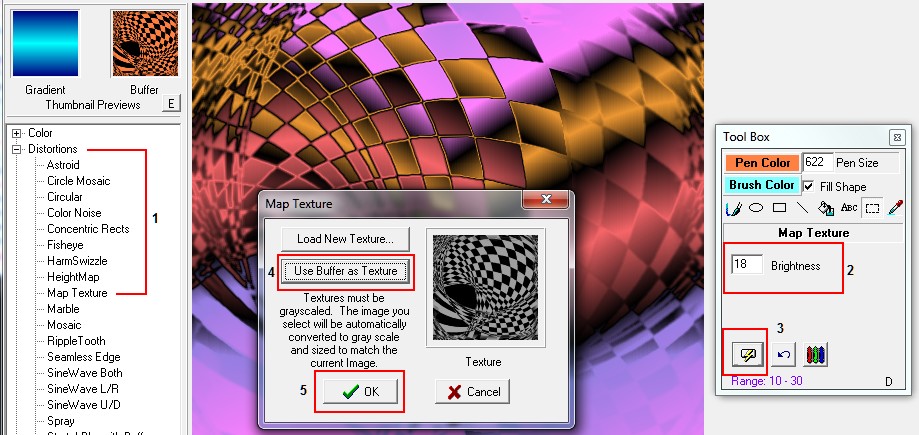
Finally apply the Map Texture effect
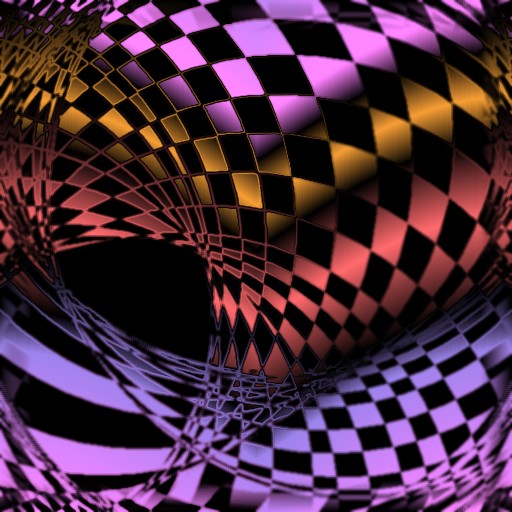
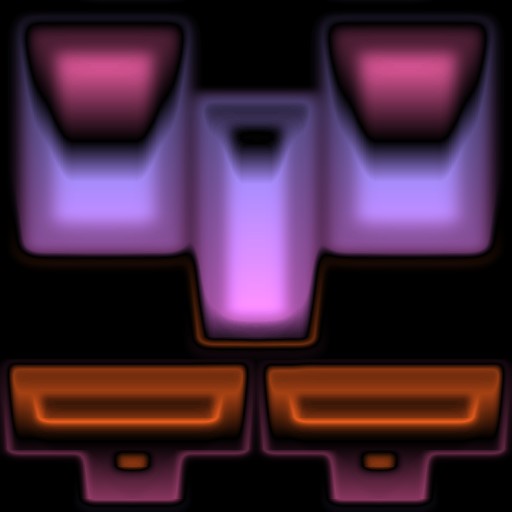
This is the final result:
Now we'll try some rectangles. Set up for this by erasing the screen to black. Set the Pen mode back to Normal, and change the size of the pen to 32. Choose contrasting colors for Pen and Brush - one light, one dark. Select the Rectangle Tool.
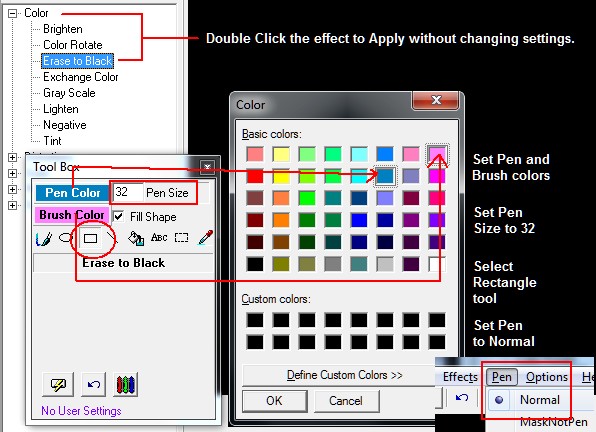
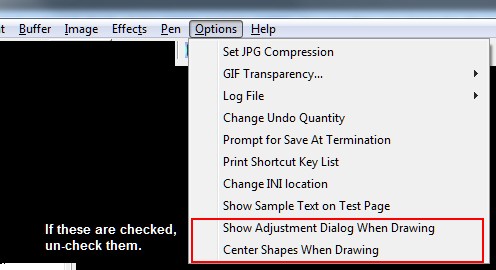
Also, make sure these two options are un-checked in the Options Menu
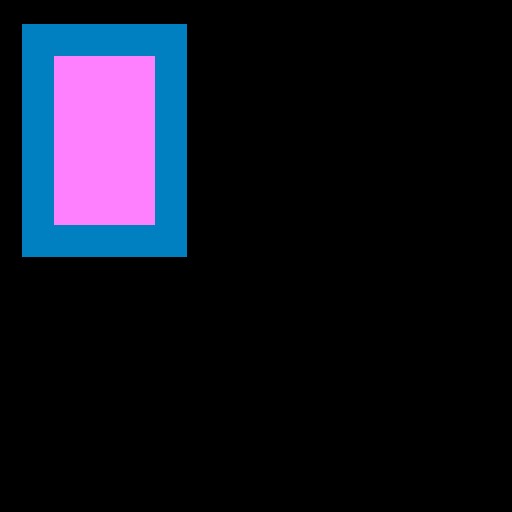
Starting near the upper left corner, left-click and hold the mouse down, dragging from the upper left towards the lower right. Release the mouse button to stop drawing. See if you can make yours look about like this. If not, your browser may let you Copy this image to the clipboard. Then Paste it into sTile.
Once your image looks similar, copy it to the Clipboard (Ctrl + C) or use the menu path Edit > Copy.
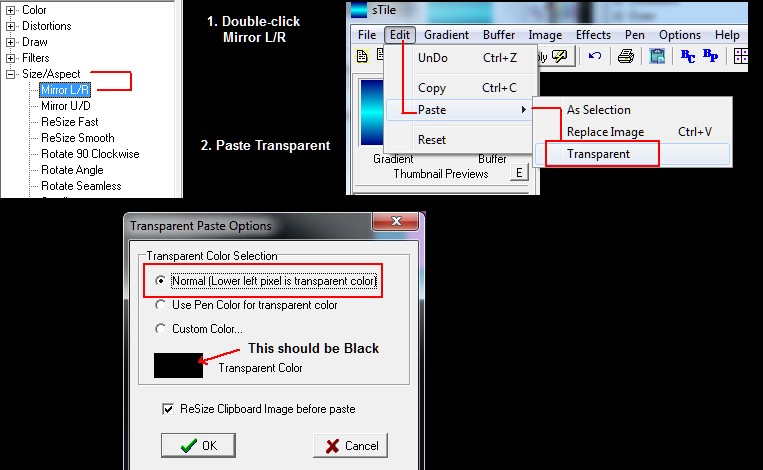
Apply the Mirror L/R effect to move the rectangle to the right side, then use the menu option Edit > Paste>Transparent. Confirm the settings shown.
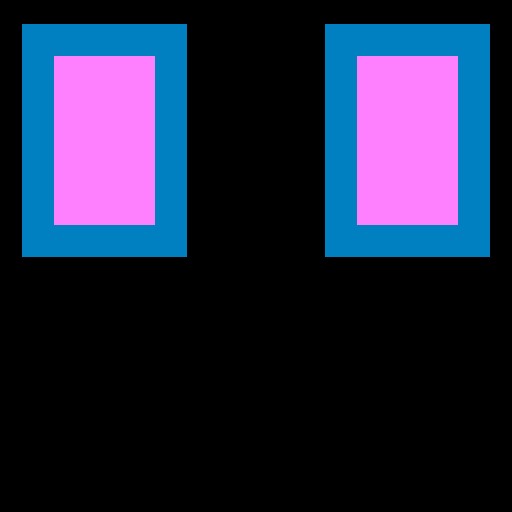
You should now have this:
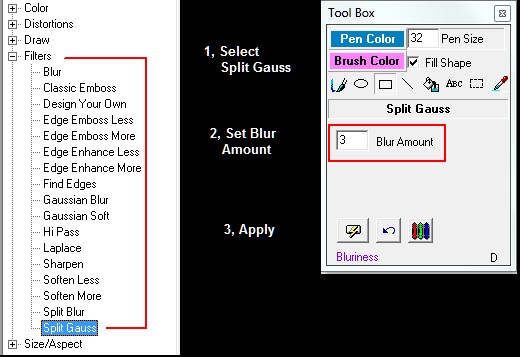
Apply the Split Gauss effect to make the rectangles a little blurry.
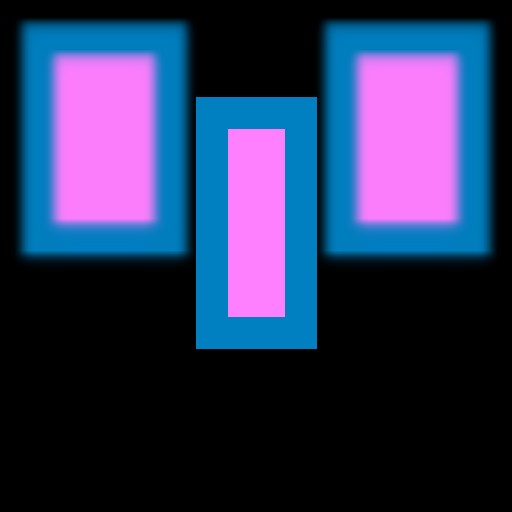
Draw another rectangle between the 1st two, try not to overlap. If it doesn't look right, just UnDo and try again. Now it looks like
Again, apply the Split Gauss effect by Double-clicking the effect in the tree. That will apply the effect with the last settings used, in this case Blurriness of 3. It should look like

Add some more rectangles at the bottom like so

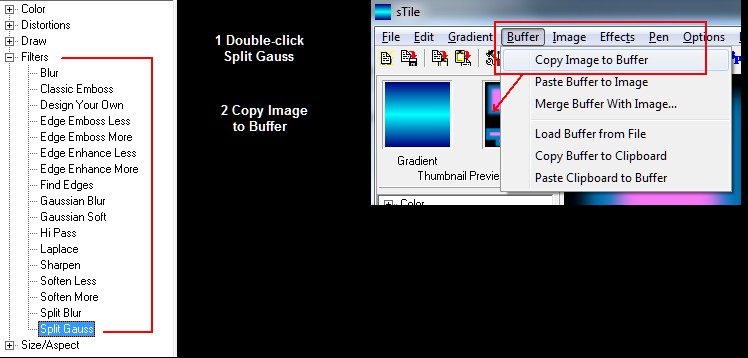
And then Apply the Split Gauss effect one more time by Double-Clicking the effect in the tree.
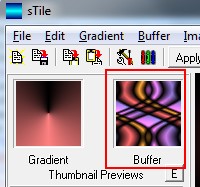
Copy the image to the Buffer using the menu path Buffer > Copy Image to Buffer. It shows in the preview
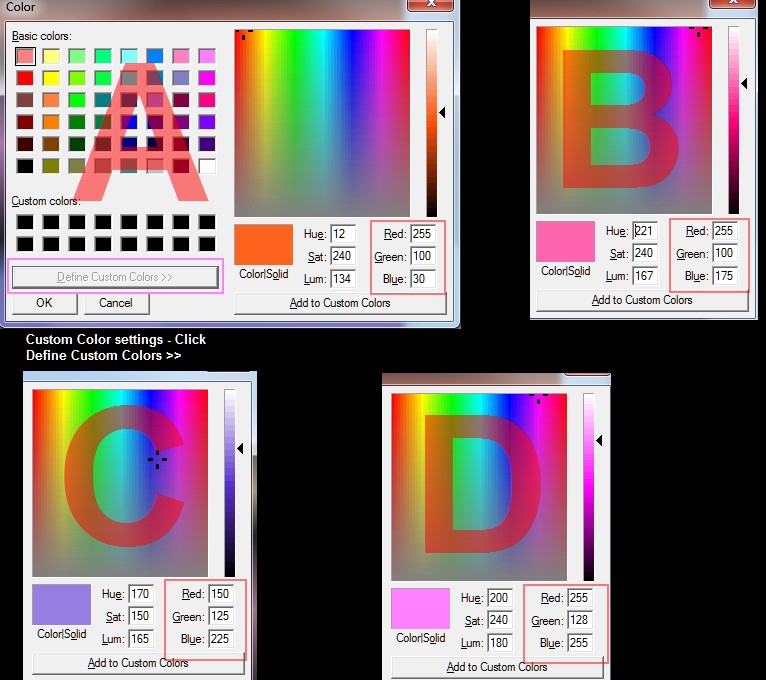
Choose a Multi-color gradient. Right-Click the image and choose Multi Gradient... This is what I used
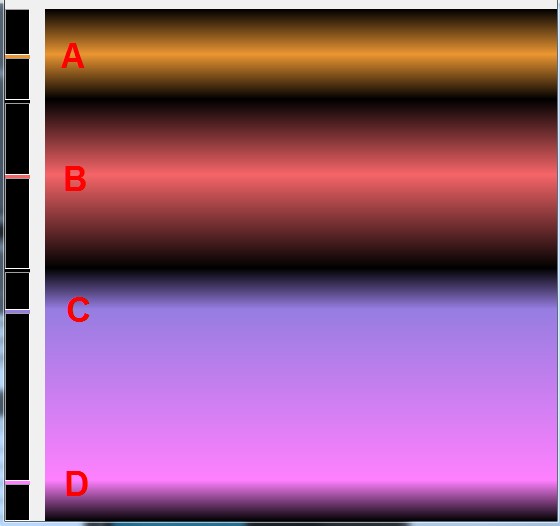
These are the Color settings for each bar. The dark bars in between are Black.
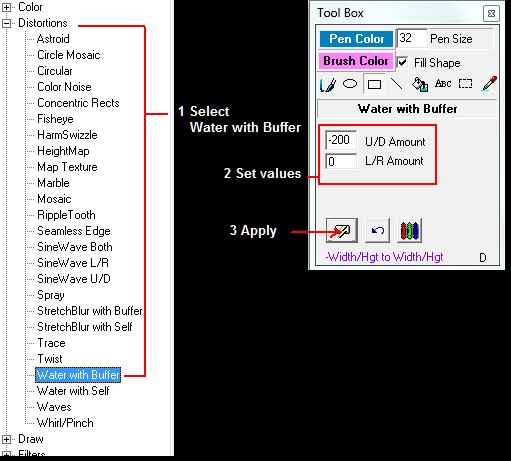
Apply the Water with Buffer effect. Use -200 in the ToolBox for the U/D value
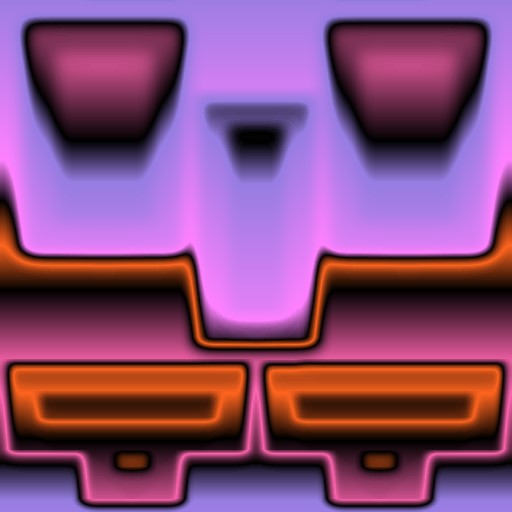
You should have this
One last thing, apply the Map Texture effect with a Brightness of 18. Choose Use Buffer as Texture and click OK. This is the final image:
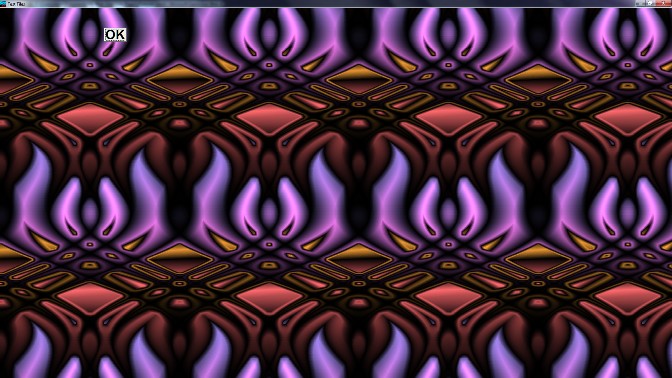
That's it! Check how it looks when tiled with Alt > I > T or menu path Image > Test Tiles.
Back to Top